Showing posts with label shelving. Show all posts

Tuesday, November 25, 2014

Clever Organized Yet Out of Sight Storage

This is a post directed to those of you lacking space or a separate craft room but may also be a useful idea even if you have a studio.


I spend a lot of time on Facebook, thus often ignoring my blogs.  There are a lot of crafters, painters, crazy quilters and beaders that formed group on Facebook and interact with each other pretty regularly.  It is fun to get instant responses and meet so many in this manner.  A fellow crafter/crazy quilter, Fran Lees Quirk, had posted this photo of her solution as a comment and was kind enough to let me share it with you all.

This is her wall of supplies.  She said it is in her bedroom where she has easy access to it.  When finished or between projects she can pull the curtains to hide it.  I think it looks great!  Just think of the possibilities.  I would love to hear from others that have had success with this type of solution.

Saturday, January 5, 2013

Still Here...

I'm still here.  The end of the year gets so busy as we approach the holidays and that is where I have been.  Since the beginning of the year I have been going through articles and pictures pulled from magazines and the Internet and purging those I must now admit I would never get to anyway.  There is just something about the beginning of a brand new year and the longing for a fresh start on just about everything.  The gyms are full of people wanting to start the year off right by getting in shape.  Weight loss organizations have those wanting to lose weight signing up.  There is also a desire to declutter or simplify parts of your home and your life.  I am among the sheep.  I start watching what I eat, working out more and sorting through piles long neglected.


I know the photo above looks like no big fantastic deal, but to me this is huge!  I reorganized my sewing room/office earlier in 2012 and have much of it the way I want it.  This photo is the top shelf of one of my bookcases.  Yes, this is the after photo~lol!  Before it was solid stacks of papers stuffed bottom of shelf and clear to the top and crammed side to side.  There was no way I could ever locate what I wanted (without an avalanche); even if I knew which of the three piles it was in and the general area of that pile it would take too much time and effort to bother.  Some of you know exactly what I am talking about don't you *smile*.  In my after shot (yes, I'm sure that is the after shot~sigh) you can see I threw out a lot of the papers and now have smaller groups sorted into plastic boxes for now.  I have separated mine by beading, fabric ideas, craft ideas I want to try and, of course, miscellaneous.  The papers not in a box yet are thoughts, ideas and notes I have put together for a book on organizing which I have wanted to write.  I actually did write one but find myself re-writing and over thinking everything I have written.  I then set it aside to look at later but could never find it until I was out of time or out of the mood.  Now I know just where to look.  The notebook in the center has some of my papers for projects I am especially eager to try.  Notebooks with sheet protectors are another great way to store ideas as they look neat on the shelf, protect the tear sheets and are easy to grab and to browse through when you are in need of some inspiration, instruction or ideas.


I have already shared this shelf, but it is one of my favorites.  It is a drying rack that I have painted and stained to go in my sewing room above the sewing machine.  The spice jars on top hold my collection of buttons which are sorted by color.  The racks extend out to accompany a lot of lace trims.  It recedes compactly when not in use.  I normally keep my stitching sample tags from TAST on the hooks along the bottom, but had them down to use when I took this photo.  I love having supplies out where I can see them so I know what I have, don't you.  It also inspires me when I have them in clear view.

I suppose this isn't really exciting to anyone but me since I didn't show you any photos of eye candy such as a luxurious room or storage unit.  I guess the idea I am trying to get across is to not get overwhelmed thinking you have to organize and clean an entire studio or any room at once.  Categorize items and maybe go back later to sort through and purge, but keep like items together.  Approach one area such as a drawer or shelf.  You will get to each when the time allows or when you are in the mood.  It took me awhile, but I am so happy with my little shelf now that I know I can find what I need when I need it. 

I hope your new year is off to a fantastic start!

Saturday, September 8, 2012

New Addition in My Studio

I have had a fairly productive day today.  I have had this shelf for years just waiting for the perfect spot.  I am sure you know what I mean *wink*.  I finally had painted it ivory when I painted my two dressers a couple weeks ago.  The more I looked at it the more I thought it really needed a different color.  I decided to go with green, so today I went and picked up the paint and started painting.  I didn't paint the rods and hinges because I was concerned they may leave marks on my items, so I just sealed them with varnish.  I kind of like the brown stain color with the green anyway.  It was a beautiful day outside so it dried quickly.  I brought it in and hung it up.  My rotating spice button jars fit perfectly on top.  There are three pegs on the bottom which I will use for my reference tags and the "dryer rack" will pull out or tuck in as shown and will work perfectly for trims or fabrics.  I am loving the green and think I may even repaint my dressers in green now (not literally right now, but in the near future)!


I have this hanging above my sewing machine where it seems pretty happy.  Don't you just love adding something new to a room?  It always makes me feel like cleaning and organizing for some reason.  Does that happen to you too?  What do you think of the green?  I am so ready for color instead of being so safe with shades of cream, white and ivory.

LINK with LINKS

There is a (linky) party going on here – for offices and with lots of interesting links. Even though this is for offices, there appears to be some really inspiring links for repurposing, constructing functional pieces, etc. that could easily be adapted for your studio.  Time to grab a cuppa and do a little visual sightseeing…


http://www.funkyjunkinteriors.net/2012/09/sns-151-junk-styled-offices.html?utm_source=feedburner&utm_medium=feed&utm_campaign=Feed%3A+blogspot%2FKCcu+%28Funky+Junk+Interiors%29

Wednesday, June 27, 2012

Organizing Isn't For Wimps!

Yesterday's progress...

I am deep into it now.  I've shared photos on here before of my disaster closet.  I started taking things out as you can see.  The transformation (at least in the closet) has begun. 


After emptying the closet I removed the doors and loaded my office-related items into the closet.  This is working out great!  I'll deal with supplies on the top shelf later.


Next I brought in one of my refinished dressers (see previous post) and placed it in the corner.  It holds tools, floss, lace, batting etc. right now, all in arms reach from my chair.  The little end table will also be dealt with later.


Today... I emptied one of the bookcases and placed it on top of the dresser, reloading it with drawers of supplies such as threads, beaded trims and other embellishments.  Placing the bookcase on top of my dresser freed up more floor space for my other dresser.


I then placed my sewing machine next to it and brought in the second refinished dresser.  I think I may be turning it the other direction so I have better access.  I was going to place another bookcase on it and run a board across the top to hold even more, but Mr. was concerned about so much weight on one area, so on to plan 'B' (whatever that is!)...


I was feeling pretty good about things until I went back in the other room to fill a few more drawers.  Yikes!  I am going to have to either (a) store a couple bins of fabric elsewhere, (b) get busy and use up a bunch of fabric or (c) downsize my supply.  I have a ton of books too which take up lots of space.  Some are my "go to for inspiration" books and not going away while some can go. 


For today I am tired.  It is about 100○ F outside and my energy is at a low level anyway.  I think I will see if I can get to my chair and do a little relaxing stitching and thinking before dinner time.  Those of you who have done this, don't you just hate this part of the process!  It can seem so daunting but somehow gets done and leaves you with a good feeling.  Have you ever gotten this far and said "forget it!", put everything back and pretended like it never happened?  It is so tempting, but I shall persevere.  Please send me some good vibes!  I'm thinking my sewing machine cabinet needs a coat of paint too, don't you?

Sunday, January 23, 2011

Great Sewing Room Idea!

I have been a saver of inspirational clippings it seems forever. Sometimes it pays off and sometimes it is a waste of time and space. I recently browsed through some clippings, purging those I really no longer had use for. The reason I was looking through my inspiration notebook is that my mom sent home four shoe boxes full of spools of thread and I'm trying to decide how and where to contain them. While browsing I came across this idea from 1980. The photos below are from an article in the March 1980 Decorating & Craft Ideas magazine (page 58 if anyone happens to still have the magazine ~ lol). I think it is an ingenious idea for storage and thought I would share it with all of you.


(Did you notice the great shelf of tagged sewing machine drawers in the reflection?) This cabinet was built to make use of an awkward space when converting an unused attic into a functioning sewing room. Following are views of the inside. But before you get to that, I want to share the credits I did happen to save with the photos: Carpentry by Steve Joseph. As previously stated, the article was in Decorating & Craft Ideas, March 1980. The article says the pattern, Code No. 1008, can be ordered from Decorating and Craft Ideas Pattern Service, P.O. Box 2522, Birmingham, AL 35201. I don't even know for sure this is a valid address or outdated. I unfortunately do not have any other information such as the author, etc.


As I am thinking of all the possibilities for using this cabinet, I am envisioning embroidery floss hanging in one section. It would be great for jars and/or hanks of beads by adding appropriately spaced shelving and hooks. It would even be great just as a jewelry cabinet. Acrylic paints, ribbons, embellishments, jars of buttons, spools of thread and oh so many other items would fit nicely. The cabinet is shallow and would accommodate lots of previously unusable spaces with the added bonus of a 3-way mirror! It could be custom made to suit almost any tight situation or space. How about sharing your ideas here with others. Lets get those wheels in motions. I would love to hear your thoughts. If you have already done something similar, please email pictures to me and I will be happy to post them! In the meantime...

Here are some more LINKS:


Gretchen shares some things from her painting studio which she recently relocated to their basement. You can get to her post through the following link:
http://gretchenbjornsonart.blogspot.com/2011/01/my-studiorelocated.html

Cathe Holden from Just Something I Made has shared an awesome organization piece for the sewing room using vintage patterns. She also shares how they are made! It is so unique. You really should have a peek. Here is the link:
http://justsomethingimade.com/2011/01/vintage-patterns-sewing-room-organizer/

Below at The Frugal Crafter is a link to a video tour of a scrapbooker’s craft room, some photos and some practical advice. This scrapbooker has a LOT of supplies and it appears amazingly organized. I’m certain you will find something useful here, regardless of your medium of choice!
http://thefrugalcrafter.wordpress.com/2011/01/18/organizing-ideas-for-crafters-and-a-tour-of-my-craftroom/

I'm planning to see you again next Sunday, so be sure to stop back! Have a great week. Connie

Friday, June 4, 2010

Organizing and Decluttering your Studio

You are probably ready for the next step in putting your studio back together by now. To briefly summarize what I have posted in the last couple of posts:

(1) If you are moving into a new space or redoing a current space, the best plan is to remove as much as possible from the room and sort through it as you do. Have a throw away area, donate area, items to think about later area and items to keep section. In your keep section, separate into categories (a) by medium such as quilting, beading, painting and then (b) by usage such as tools, supplies, resources. If you are organizing or cleaning your room, just do it in bite-size pieces and avoid being overwhelmed by thinking it all has to be completed at once.

(2) After all of the painting and prep work such as installing shelving is completed, prepare a floor plan according to your needs and bring in the large pieces of furniture and equipment. Evaluate the placement by mentally walking through projects and steps you take to complete each. If larger pieces aren't working, get rid of them if you can and consollodate a couple of stations into one area.

Now, (3) after you are satisfied with your arrangement, begin to bring in the supplies, tools and smaller pieces of equipment. Keep like items together as you place them in the areas you feel they would make the most sense to have them - near the area or station where they will be needed. By like areas I mean all the quilting related items, painting related or beading items as well as in each of these areas keeping cloth together, the papers in one area, paints grouped together, the beads, buttons and/or other embellishments together, stamps and inks.

Because you have separated and kept these items together you can readily see how much space will be required to store each. If it appears you have ample room you can begin to 'organize'. As you place items around the designated work area or work surface, keep in mind that not everything can be within reach. Keep items that you continually use such as certain tools or equipment in the most convenient area but preferably off your work surface unless it makes sense to have it there. Those items you rarely use should be placed in the more out of the way storage areas such as the top shelf or in a closet.

Remember these items are not glued into place and can be moved now or later to areas that make more sense. Also, at this point your studio is not going to look fabulous! Below are a few of my photos taken as I returned my tools, supplies and equipment to my studio.


I had already mentioned I had placed a deeper table in front of the window (above) which made it difficult to reach the window in order to open and close it. I had made the decision that larger table actually took up too much space and removed it from the room completely. I honestly don't miss it. Instead I use one larger work table and occasionally the counter shown above.

I do a few periodic projects in stained glass. For that I have a board that I set on top of the table. It allows me space to cut, place and solder the pieces. The grinder and some other supplies are on my rolling glass stand. I can remove my stained glass board and place it on the counter if I need to begin work on another project.

I often do watercolor painting on this same table. My paints are now kept near the table in a wire basket. My favorite brushes are on my table for easy access and safe keeping.

My bead projects are either done at this same table or in the house on a tray. Even though my beads are very close to my work table I use trays in my studio to gather my beads and findings for a specific project. When I complete the project I simply take the tray over to my bead storage area and 'unload' it. My beading tools are kept in a caddy as shown on a previous post. This makes it very simple to move in the midst of a project for whatever reason or to quickly put items away and clean up.


Above on the wall is the repurposed spice rack I discussed in a previous post. Also shown is the dress form I often use to hang a necklace on to see how it is going to lay. It is between my bead stash and counter area. One of these days she will get a makeover. I sometimes drape fabric over it to photograph jewelry, so it is handy to have it next to the window.


I have a few (more now added) display pieces I wanted to keep together. I don't do a lot of shows at this point, but felt I wanted to keep these for future open houses or show displays. They are on a shelf not real easily accessed because I don't use them often at this point. The shelf will be painted white at some time.


Above I have placed items used less often. The top shelf requires a ladder to access the items located there. Yes, this is where my plastic is. It protects the items I use less often such as stencilling and stamping equipment, framing supplies, paper making supplies and sculpting tools. The wire baskets on the shelf below that holds items I use a little more often, but not continually. They include for example some stained glass supplies, bead containers, string, and special tools such as wood burning, hot glue gun and heat gun. Notice I have placed tags on each container to identify in general what is contained in each.

Below are my favorites! Beads and lots of them! Can you believe I had all these gorgeous beads tucked away in drawers and plastic bags? I had the two sets of identical shelves made, painted them myself in a neutral color to show off the colorful beads and spaced them apart to allow for deeper shelving to be placed between them. You will see what I used it for in a later post. I also placed the shelves where they would get the most sunlight and sparkle the most.


Finally is my main work table. My son was getting rid of the fluorescent light fixtures so I snagged them and placed one on hooks above my counter and one above my work table. I placed one warm bulb and one cool bulb in each. I will discuss lighting in a future post, which is crucial in a studio.

As you can see, my beads are not far from the work table. Below my work table which is actually a drafting table, I had to store my leading for stained glass (the long skinny cardboard box). This keeps it off the floor and pretty much out of my way. I have also for now placed my tools under the table and a tool box containing my portable outdoor painting supplies.
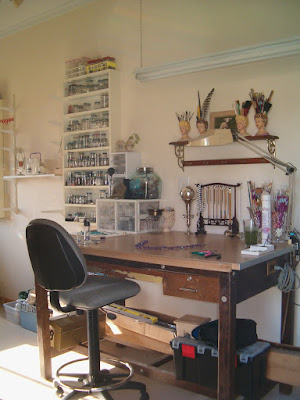

The problem I am tackling right now is the unattractive heating and air conditioning unit in the corner (see below). I think I have found a solution for camouflaging it, but that is the area I am focusing on right now and will share the results when completed.


As you work in your room you will find things that aren't working for you. Figure out what isn't working and why. Then focus on how to resolve the issue. Brainstorm with friends and family members. They may have ideas that could work. They have the ability to focus on that one particular problem without being distracted and can look at it with fresh eyes. It might surprise you what they come up with and they will probably be flattered that you asked them which will make them really want to come up with something solid!

Also remember that your studio arrangement is not set in stone, at least I hope not. Things can be later switched around and rearranged if they aren't working or if your needs and interests change.

Again, I hope this post is helpful. Looking at the last image, what would you do to resolve this eyesore? The area can't be totally blocked off because of airflow and water drains from it into a bucket. The filter also needs cleaned so access to that is crucial. I just thought I would throw that out in case you wanted a challenge or had completed your studio with no problems and wanted to know what it felt like to have such a problem.

The next steps are the fun ones, so check back! See you soon!

Saturday, May 8, 2010

Storing Art Supplies and Making it Look Pretty

A studio makeover is a continuous process. That is OK, because everything doesn't have to be done right away. It is best to work through things in sections so you aren't totally overwhelmed. My project this week was this counter. Below is a photo of the counter I bought at a discount store. This 'before' photo was taken as I was placing items in the room and everything hadn't quite found a home. The inside of the counter had dividers that work really well for my watercolor papers, pads, safety items and rolled up stained glass patterns while the bottom section holds some of my wire baskets of supplies. The top is a good solid work area and a good place for other supplies or work in progress.

I decided I wanted to cover the front of the counter to hide the stored items. I had some fabric I'd purchased for cushions in our sun room. I obviously didn't finish that project, but bought ready made cushions on sale instead, but that is another story. The fabric seemed perfect for this project. I simply measured the width and height of my cabinet front, allowed about 6" in height for the hem and to make a pocket for the rod to fit through. The 'rod' is simply a curtain rod that snaps onto brackets which came with it. For the width of the fabric, I cut about 2 1/2 times the width to create the gathers. It wouldn't have to be that full, but I do like the look. Below are some 'after photos'.


I really like the finished look it gives this area. Although it is more practical I suppose to leave the shelves easily accessible, it just isn't as pleasing. I can still easily get to what I need. I relate it to leaving the doors off your kitchen cabinets or your closet--which by the way works great for some styles and tastes. Don't you agree this looks better than the before? Is this something you have done or could do in your studio?


This bottom photo is a metal shelf/towel bar that I set upside down on my counter (see above)and currently use it to hold some of the jewelry I designed. (Some of the jewelry is shown on my other blog: http://ceoriginals.blogspot.com/) Another repurposed item that could serve a multitude of functions other than the intended! Think 'outside the box' as they say.


Have a great weekend and Mother's Day!!!

Thursday, May 6, 2010

Organized Stained Glass in the Studio

I believe I mentioned that I do some stained glass occasionally. Storage for the sheets of glass can be cumbersome. I had it stored in the basement of our home for awhile. It was just leaning against the wall under the staircase. We had water leak into the basement a couple of times and let me tell you, it is one serious workout moving all of that glass out of the way. I decided I wanted something I could move around in my studio and didn't want to leave the glass leaning in a corner and all grouped together.

I designed the cabinet shown here to hold my smaller pieces of glass. the dividers help me separate the various colors and make it much easier to find the glass I'm looking for. I convinced my son...begged my son...to make the stand for me. These photos were taken as I was setting up my studio. You can barely see on the photo below, on the right hand side, I have another stand to hold my full sheets. What can I say, I got a bargain at a garage sale for all this stained glass and just couldn't pass it up. Glass is extremely heavy and fragile, so to make it easier to move if necessary, the stands are on heavy casters.
I also have a glass grinder I found at a garage sale. When our huge old microwave finally broke down I salvaged the glass tray that was inside it and placed the glass tray under the grinder on top of this stand to catch any drips and glass dust. It works perfect! It has a small lip to keep water from running off and protects the surface of the stand. I don't believe I have any photos of that, but I'm sure it will show up in a future post.

I have said this before and I'm sure I will be saying it again, but portability is so nice in an art or craft studio. In another studio this stand could be moved into a closet when not in use or it can easily be moved from one work station to another. I keep thinking I should do some really large projects so I can use up a bunch of this glass, but I mostly do smaller things. A serious glass artist would need several of these cabinets, but for a glass hobbyist it works great.

I hope this gives you some ideas!

Saturday, May 1, 2010

Garage Sale Finds for Storage

Garage sale season is here! I found a couple of bargains this weekend. Cheap - cheap - cheap! The two divided containers were only a quarter...25 cents for both. I'm thinking they will work well to separate items in my art desk drawer...or somewhere in the house. I'm just not sure, but I know I will find a use for them.


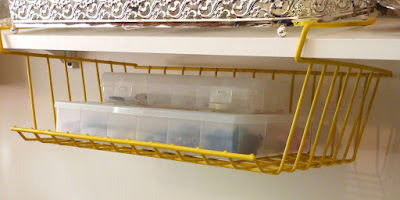
This second item was 50 cents. I almost bought one the other day at a discount store for about $8.00, so I'm thinking I can find something else to do with that $7.50--like maybe go out to lunch with friends. The color isn't the greatest, but that is why they have paint for plastic now. I will probably paint it white so it kind of disappears. It is shown here with a couple of my (yes, plastic) containers of glass beads. It will keep the plastic boxes convenient, but not too prominent. If I tire of using it in my studio, I know it will work great in the garage or laundry room.