Showing posts with label project on the go. Show all posts

Thursday, February 12, 2015

Refurbished and recycled suitcase

Recycled Suitcase

I bought a small suitcase at a sale for $1.00.  It was in pretty bad shape so I figured I couldn't hurt it.  First I spray painted the entire outside of it with white paint.  I then painted a floral bouquet on the top using acrylic paints.


Inside before photo

I removed any loose paper on the inside along with the old pocket on the top/inside, replacing it with a lightly quilted fabric which I had used a few years as a tree skirt at Christmas.

Inside top with newly created pocket


I will use this for some of my craft items but haven't decided what for certain.  I have about 30 of the little mint tins shown below.  Thirteen of them fit nicely together as shown.  These could be used for buttons, beads, or any number of small items and a label could be added to indicate the contents.

Inside bottom of suitcase showing tins
 
What would you use it for?


My watercolor palette fits perfectly, but I would really have to make sure it was clean before I put it in the suitcase so I'm thinking that won't work so well.


At this point I'm actually thinking I will use it for whatever current project I am working on.  I can keep everything I need inside the case and if we go somewhere I can easily close the lid and take it along, knowing I have what I need with me.

Wednesday, February 6, 2013

Storage for Studio Stash

As I was getting ready to add some links here I noticed I have 96 posts and 96 followers.  No significance here, I just thought it was a funny coincidence.  I have been wrapping up some projects from 2012 and getting started on more for 2013 and it seems I have neglected this blog.

I have run across some great links that I wanted to share and I thought that would be a much better thing to do than to show you the (drastic) state of my sewing studio right now.  

One site I especially want to direct you to is http://creativedaily.blogspot.com/2013/01/studio-organization_30.html  


Lorraine has come up with a fantastic idea for sorting her scraps by color using some bins intended for scrapbookers.  Lorraine bought hers at Mitchael's but also directed me online to Amazon where they are also available.  I get excited just anticipating all the possibilities!  I think they would be absolutely perfect for project trays for works in progress (wip) or for keeping projects together when you travel.  Other items they would work for might include floss/threads, ribbons, stamps, beads, buttons, painting/dyeing bottles, small tools, lace, and glues (just to name a few ~ lol).  There are a plethora of ways you could sort your items as well.  

Thanks Lorraine, both for sharing this on your blog and for allowing me to post the photo!
(Also, be sure to visit her Etsy shop too)

Following are some more links for ideas and inspiration:

Ribbon and bits of trim  getting tangled in a drawer?  This site offers a solution by upcycling those little plastic bag closures found on bags of potatoes, apples, oranges, bread etc. (at least found here in the U.S.).   So creative!

Here is another fun idea for storing pearl cotton thread using tongue depressors (giggle)…

We all know binders are a great way to store various patters, clear stamps, clippings and/or other information.  I have been working on a binder for an aunt which I will share on my other blog.  There is a lot of information on covering binders on the Internet and I thought perhaps you would be interested.  Fabric covered binders could easily be customized/personalized to fit in your studio decor or anywhere in your home.  Following are some links that I found to be clear and easy to follow.  Each has a little different approach.

Fabric covered binder tutorials:
and one using Mod Podge:

While looking for the Project Girl’s tutorial above, I looked further through the site and found some great organizing info and repurposing that could easily be adapted for any craft room:


Find anything that inspires you?  I would love to hear about it.

Sunday, November 20, 2011

A Fun Find and a Do It Yourself Mini Ironing Board!

It's just a little thing...a lot of little things!


I just had to share these handy little containers I found at Office Max. They are normally $.99 each and I was able to get them on sale for $.59 each. They come in different sizes, from about .07 litre up to shoe box size and larger. Honest, I am not putting in a plug for the office supply store. I just want to share that you never know where you will find the perfect solution for some of your craft needs! These little boxes are going to be perfect for my crazy quilt bits and pieces and some of my other stash. I'm also using the for my supply of snaps that had been contained in a whipping cream container (after it was empty and cleaned out of course).


Since they seem to close securely I think they will be great for projects on the go and can be easily thrown into a bag or box to take with me. They do come in clear pink and purple and maybe blue, but I like the clear so I can readily see what is inside. The name 'Really Useful Box' is molded into the side. It says they are made in UK.


LINKS:


To start off, I absolutely love this idea Diane Knott shared of a mini ironing board! Talk about space saving ideas! Be sure to visit her blog (either through the link here or by clicking on the photo). She is such a talented artist in any medium she works with and shares some of her very inspiring creations. Thanks so much Diane for letting me share this photo.


http://dianeknottsmusings.blogspot.com/2011/11/mini-ironing-board-for-craft-room-small.html

Below are some more sites to visit to get you motivated!


http://www.gailclaesstudio.com/blog/specialty-closets-meant-for-organizing-items-hobbies-plus-projects

http://woolyblissfeltmaking.wordpress.com/2011/11/01/organizing-the-studio/


Find seven no-fail organizing tips for crafters here…
http://www.mixed-media-artist.com/2011/11/seven-no-fail-organizing-tips-for.html?utm_source=feedburner&utm_medium=feed&utm_campaign=Feed%3A+MixedMediaArtist+%28Mixed+Media+Artist%29

Talk about a makeover! See the inspiring craft room shared on this link!
http://iheartorganizing.blogspot.com/2011/11/reader-space-amandas-organized-craft.html

Sunday, January 30, 2011

Handy Carry-All and more Links

I'll have that 'to go' please. Classes sometimes require you to take supplies with you, as does getting together with friends for a fun afternoon/evening of crafting, or just going shopping for pieces and parts to finish a project. Here is an inexpensive, convenient and readily available carrying case. You do not need to go to an art/craft shop to find one since they are available at many drug stores and stores like Kmart or Dollar Stores that carry a variety of items. What is it you ask. It is a travel case for toiletries! I used to travel extensively for my job and always kept one of these packed with my travel supplies. I no longer travel as I had and kept moving this from place to place...out of the way. Then it occurred to me! This would be great for transporting so many things.

If you are a decorator or just redecorating a room in your home, it is a handy case to grab as you head out the door to look at carpeting or furniture, lighting or anything else for your room. You can carry your fabric samples, color swatches, carpet sample, floor plans, measurements, trims or wood finish samples. I hate pulling these things out of my purse and then placing them back without looking like I'm stealing something off the shelves. Having a transparent travel bag means you don't have to constantly pull fabrics out to compare with an item in the store. You can carry the bag separate from your purse if you like and when you want to see if the upholstery fabric for example will match, you just hold the bag up next to the store's item!


Don't forget any patterns you might be using, measuring tape, small notebook and pencil for jotting down prices or other information you may need to refer to later. Take along any trims you would like to use somewhere in the room. Maybe you have a color photo of a favorite painting you own that will be in the room and you want to coordinate colors used in the painting. You may want to include a color image (from a catalog or even a photograph) of the bedspread you will have in the bedroom or dishes that will be displayed in the kitchen/dining area. A case of this sort would work equally as well for carrying patterns, buttons, fabrics, threads etc. that you will be using to make a blouse, dress or other clothing.


As I mentioned in the opening paragraph, this bag would be great for taking supplies with you to class or even on a trip. You can place scissors, your needle case, and other basics in a separate case such as a makeup bag and place that inside one of the pockets of the travel case. Buttons, beads, other embellishments can go in baggies or small bottles. There should be a travel case to accommodate your paint supplies and applicators, sculpting materials, doll making supplies, scrapbook papers, adhesives and embellishments, drawing materials or most anything else you may need to take with you.


The particular one I have is divided in two halves with zippers for each half. The two halves then close together with another zipper. Books and patterns could fit between the two halves. It also has a handle which is really a plus. Some travel cases have a larger single compartment with pockets on the outside. There is a huge variety available. The clear plastic ones are usually pretty inexpensive and waterproof. Of course there are also some pretty cloth bags if you prefer. It's your personal choice!


As I said, separate your items with baggies if necessary. If it involves sewing, maybe one of those cute little sewing kits with needles, mini scissors, threads and thimble would be all you would need to add for travelling.


I hope this gives you some ideas and that you find the info useful.

Now for some links to other sites where there's some wonderful organizing ideas...

LINKS:


Mary Anne, who is a dear sweet friend, has been busy downsizing and organizing and has a wonderful idea for storage of clear stamps on her blog, Magpies Mumblings. She is very talented also, so while you are there take a peak at her other posts.
http://magpiesmumblings.blogspot.com/2011/01/oh-oh-mess.html

There are some great storage ideas here for your studio! Jane at the Borrowed Abode also shares a tutorial on making a jewelry display from an old window along with some other terrific ideas.
http://theborrowedabode.com/category/officedressing-room-makeover/

Follow this link for some ideas on organizing your supplies.
http://crafted-spaces.blogspot.com/2011/01/organizing-your-supplies.html

I don’t know how many of you are familiar with Clip-it-up, but they have come up with a mega organizer you just have to see. Check it out here…
http://simplyreneeinc.blogspot.com/2011/01/clip-it-up-all-in-one-organization.html#comment-form

Celeste found a solution using a steel shelving unit for her fine arts supplies.
http://celestevaughtart.blogspot.com/2011/01/organizing-studio-again.html

That's all I have for this week. I will be (hopefully) painting my office and doing some arranging and other work, so next weeks post may be pretty brief, but I'll do what I can. I hope you all have a wonderful week!


Friday, November 26, 2010

Cosmetics Case to Project Case

Again, sorry I have been neglecting this site. I have recycling/repurposing projects in mind but haven't had a chance to work on them. I did get this one far enough along to use and to give you an idea of my intentions. I was cleaning under the sink in the bathroom and ran across this metal, very sturdy makeup case.


It's one of those 'holiday time' gifty items. However, it was quickly becoming a catch-all for all of my almost empty makeup containers or rarely used items.
It was such a sturdy box and the top shallow containers were hinged allowing them to be pulled off to the side giving access to the somewhat larger section underneath. The bottom (or back) had nice rubber pads to protect the surface it was sitting on. The hinges and handle were all good and solid.

I decided this was not a case to send to the landfill. I cleaned it up as best I could for now. I discovered the brush holder that was in the lid was held securely in place with Velcro (a/k/a hook and loop). Later on when time allows, this will make it easy to transform into more of an appropriate holder adapted for my scissors, pins and other supplies.


For now I can use it to hold some supplies such as small scissors, seam ripper, tubes of beads, etc.


I am using mine for a CQ project right now. Since I began doing crazy quilting I have found I need (yes, need) all of my coordinating ribbons, beads, buttons, floss, threads, needles, small scissors, and other embellishments with me nearby. They were strewn on the tabletop. I move from place to place and room to room when I work on my projects whether it be beading or crazy quilting, whatever.


This case keeps most items contained and easily accessible. When I quit working on something for the time being, I simply fold up my block or other project and place it in the bottom, throw other items sitting about inside the case and close the lid.


When I am ready to work on it again it is all right there in one sweet little package easily transportable to where ever I decide to plant myself.

I am loving this piece. I have previously shared photos of my dining room table full of crazy quilting 'stuff', serving as the central hub for supplies. It was always a mess. I will sometime in the future re-do the holder on the lid and will more than likely paint and personalize the overall case, but for now it works just fine. I can see a case like this working for a variety of crafts on the go.

Sunday, April 11, 2010

Compartmental Carrier

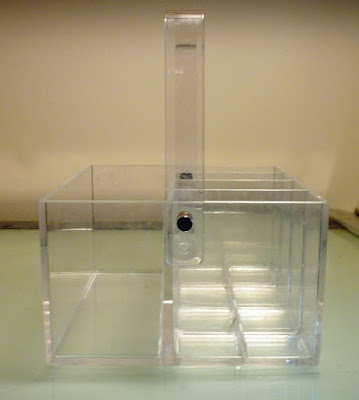
What's inexpensive, handy and portable? My new garage sale find! I bought this piece for a nickel! I couldn't even wait to clean it up before sharing it with you. This piece could be used for so many things. Can you tell I was excited to find it? It could be used for brushes, scissors, tools, crochet hooks, pencils and markers - just to name a few of the obvious items. If you chose not to use it in your studio, it could be used for silver/plastic ware and napkins or for cosmetic brushes and cosmetics, or hair care products and brushes and combs. For a nickel how can you go wrong?


The handle will adjust to two heights or is removable. The handle is also stationary so it doesn't tip when you are carrying it if the weight is not distributed evenly. One half of the box is undivided and the other half is divided into four equal size sections.


I think it will work great for my jewelry tools. I love the fact it is a tote and can easily be carried to where I will be working. I love that I can see through it. I also love that my tools rest securely in place and I don't have to worry about any of them dropping out or the tips getting damaged.


Keep your eyes open and your imagination in gear because you never know where you might find a treasure. Repurposing items is great for the environment as well. If they only had a nickel on this, odds are it would have gone to the dumpster had it not sold. One less item in the landfill. Go green!!!

Tuesday, April 6, 2010

Thrift Store Find - Portable Bead Kit

One really nice thing about bead weaving with tiny seed beads is the small amount of room they take. This is a small tin that measures only 3 3/4" x 5" x 1 1/4" H with the lid on. I found it at a thrift store for under a dollar and use it all the time.

Below is a peak inside showing one of my current beading projects. As you can see, it easily holds my beads, thread and work in progress. I also carry a small pair of scissors and a mini pliers (for when the needle just won't pull through. A copy of my pattern is folded and kept in the bottom in case I need to refer to it. The glass vials are expired vials used to hold blood that is drawn. The stoppers are rubber and hold securely.


I keep a small square magnet on the inside of the lid. As shown below, it is used to hold my needle in place so I can find it easily. This also helps keep the thread from slipping out of the needle.

I take this tin with me on trips in the car or anywhere else I know I am going to have an opportunity to get a few minutes beading time in. I pour some of the beads into the lid so they are easy to get on my needle. Maybe a few of these could store your works in progress? The small tins could be useful to hold so many things in your studio and they are so pretty! I think they would work really well for Artist's Trading Cards especially. I would love to hear what purpose you could find for them.