Showing posts with label carrier. Show all posts

Thursday, February 12, 2015

Refurbished and recycled suitcase

Recycled Suitcase

I bought a small suitcase at a sale for $1.00.  It was in pretty bad shape so I figured I couldn't hurt it.  First I spray painted the entire outside of it with white paint.  I then painted a floral bouquet on the top using acrylic paints.


Inside before photo

I removed any loose paper on the inside along with the old pocket on the top/inside, replacing it with a lightly quilted fabric which I had used a few years as a tree skirt at Christmas.

Inside top with newly created pocket


I will use this for some of my craft items but haven't decided what for certain.  I have about 30 of the little mint tins shown below.  Thirteen of them fit nicely together as shown.  These could be used for buttons, beads, or any number of small items and a label could be added to indicate the contents.

Inside bottom of suitcase showing tins
 
What would you use it for?


My watercolor palette fits perfectly, but I would really have to make sure it was clean before I put it in the suitcase so I'm thinking that won't work so well.


At this point I'm actually thinking I will use it for whatever current project I am working on.  I can keep everything I need inside the case and if we go somewhere I can easily close the lid and take it along, knowing I have what I need with me.

Monday, September 17, 2012

Repurposing to Add Surface Space

Do you find your actual working space closing in on you?  One idea that might work for you is to add an additional space above your work space.  I was running into this problem while working on some jewelry recently and as you can see, adding this bed tray gave me that badly needed added work surface. 


A bed tray worked well in this space because they are fairly short, so your items are still within easy reach and easily visible.  This is on my fabric dresser top.  I also especially liked this bed tray because it has a back and sides that kept the beads and other items from falling off the back to an area difficult to reach without moving the dresser out.  And, image that this one was already green! 

This sewing room of mine is still a work in progress and I am approaching it one "issue" at a time.  I normally work on my jewelry in my studio, but had something else going on back there which I have since completed.  This bed tray was the perfect temporary solution to my lack of surface work space.  It also works great if I decide to pick the work up and take it to another room.  Yes, I still work all over the house.  I follow my muse around ~ lol.  Do any of you do that?  Sometimes I just want to be working around other humans or find the light better in another area for the project I am working on.

I hope you found this a useful idea!  Sorry, no links this post.  But if you have found a similar solution and want to share it with everyone, feel free to add your link.  Does anyone actually use bed trays for their intended purpose?

Saturday, May 28, 2011

Studios are Like Snowflakes

They say no two snowflakes are alike. I say no two studios are alike! How can they be? No two artists work the same.


That is why you are the one to decide what your studio needs to look like, sound like, smell like, and feel like as well as its function and how it flows. It should be a reflection of who you are as an artist. You should enjoy spending time in your studio. It doesn't need to 'match' the rest of the house unless of course you are sharing a corner of the living room. Even then you can add little knick knacks or artwork you love and that inspire you. That is a subject on which I can go into more depth and I will reserve that for a future post.


For this post I just want you to take a long, hard look at your studio and think about whether it truly tells your story. Could a customer or friend walk into your studio and know by what they see what your artwork is likely to be? Do you love color but settled on a neutral shade for the walls to be safe? Some artists keep white walls so the colors of their materials are the focal point. Are you a minimalist who wants your supplies all behind doors? Do whimsical things make you happy? Do roses make you comfortable, or do they make you want to gag? Each artist is unique and that is OK! It is better than OK! How boring it would be if we were cookie cutter artists.


As you are analyzing your studio, think about the types of projects you work on and the steps you go through as you work. Are your work stations set up so they are conducive to a convenient flow as you go through the process? If you are tripping over cords or having to walk around a piece of furniture or equipment every time you do a certain part of your creating, try to determine if there is a better way to arrange things in your studio so what you need is at hand as you need it. Keep items you use most often the closest to where you use them. It might even help to write down the steps you go through as you work. Is your sewing machine at one end of the room and the iron on the other side of the cutting table? This is a pretty obvious problem, but I'm simply pointing it out as an example.


I'm just saying you can ask for advice and opinions, but go with what works for you and what pleases you.


The photo of the tote on this post is a re-do I created. (Most of you know I love roses). You can find more about it here. I was intending to use the tote for storage in my studio, but it had other ideas, so I gave in. A tote like this would work well for containing tools, buttons, glues, tags, etc. you use often. You could customize something like this tote to suit your own taste by leaving it rustic, painting it with bright colors, country colors, embellishing it with rhinestones or decoupage it with vintage images. It is just an example of how you can add items to your studio to personalize the space. Be on the lookout at garage sales, flea markets or thrift stores for other items you could customize for your studio.


Have a memorable weekend.

Sunday, January 30, 2011

Handy Carry-All and more Links

I'll have that 'to go' please. Classes sometimes require you to take supplies with you, as does getting together with friends for a fun afternoon/evening of crafting, or just going shopping for pieces and parts to finish a project. Here is an inexpensive, convenient and readily available carrying case. You do not need to go to an art/craft shop to find one since they are available at many drug stores and stores like Kmart or Dollar Stores that carry a variety of items. What is it you ask. It is a travel case for toiletries! I used to travel extensively for my job and always kept one of these packed with my travel supplies. I no longer travel as I had and kept moving this from place to place...out of the way. Then it occurred to me! This would be great for transporting so many things.

If you are a decorator or just redecorating a room in your home, it is a handy case to grab as you head out the door to look at carpeting or furniture, lighting or anything else for your room. You can carry your fabric samples, color swatches, carpet sample, floor plans, measurements, trims or wood finish samples. I hate pulling these things out of my purse and then placing them back without looking like I'm stealing something off the shelves. Having a transparent travel bag means you don't have to constantly pull fabrics out to compare with an item in the store. You can carry the bag separate from your purse if you like and when you want to see if the upholstery fabric for example will match, you just hold the bag up next to the store's item!


Don't forget any patterns you might be using, measuring tape, small notebook and pencil for jotting down prices or other information you may need to refer to later. Take along any trims you would like to use somewhere in the room. Maybe you have a color photo of a favorite painting you own that will be in the room and you want to coordinate colors used in the painting. You may want to include a color image (from a catalog or even a photograph) of the bedspread you will have in the bedroom or dishes that will be displayed in the kitchen/dining area. A case of this sort would work equally as well for carrying patterns, buttons, fabrics, threads etc. that you will be using to make a blouse, dress or other clothing.


As I mentioned in the opening paragraph, this bag would be great for taking supplies with you to class or even on a trip. You can place scissors, your needle case, and other basics in a separate case such as a makeup bag and place that inside one of the pockets of the travel case. Buttons, beads, other embellishments can go in baggies or small bottles. There should be a travel case to accommodate your paint supplies and applicators, sculpting materials, doll making supplies, scrapbook papers, adhesives and embellishments, drawing materials or most anything else you may need to take with you.


The particular one I have is divided in two halves with zippers for each half. The two halves then close together with another zipper. Books and patterns could fit between the two halves. It also has a handle which is really a plus. Some travel cases have a larger single compartment with pockets on the outside. There is a huge variety available. The clear plastic ones are usually pretty inexpensive and waterproof. Of course there are also some pretty cloth bags if you prefer. It's your personal choice!


As I said, separate your items with baggies if necessary. If it involves sewing, maybe one of those cute little sewing kits with needles, mini scissors, threads and thimble would be all you would need to add for travelling.


I hope this gives you some ideas and that you find the info useful.

Now for some links to other sites where there's some wonderful organizing ideas...

LINKS:


Mary Anne, who is a dear sweet friend, has been busy downsizing and organizing and has a wonderful idea for storage of clear stamps on her blog, Magpies Mumblings. She is very talented also, so while you are there take a peak at her other posts.
http://magpiesmumblings.blogspot.com/2011/01/oh-oh-mess.html

There are some great storage ideas here for your studio! Jane at the Borrowed Abode also shares a tutorial on making a jewelry display from an old window along with some other terrific ideas.
http://theborrowedabode.com/category/officedressing-room-makeover/

Follow this link for some ideas on organizing your supplies.
http://crafted-spaces.blogspot.com/2011/01/organizing-your-supplies.html

I don’t know how many of you are familiar with Clip-it-up, but they have come up with a mega organizer you just have to see. Check it out here…
http://simplyreneeinc.blogspot.com/2011/01/clip-it-up-all-in-one-organization.html#comment-form

Celeste found a solution using a steel shelving unit for her fine arts supplies.
http://celestevaughtart.blogspot.com/2011/01/organizing-studio-again.html

That's all I have for this week. I will be (hopefully) painting my office and doing some arranging and other work, so next weeks post may be pretty brief, but I'll do what I can. I hope you all have a wonderful week!


Sunday, November 28, 2010

Super Size It for Uncompleted Projects Storage

I ran across these wonderful large Ziploc bags awhile back. They are sturdy, roomy, transparent and have a zipper lock to seal them tight...dust proof, water proof and spill proof! They also have a generous cut-out at the top for carrying them or hanging them.


I decided to use these for my 'works in progress' also known as UFO's. I have a habit of getting ahead of myself and pulling fabrics or other pieces for a project I want to make. They will also be fantastic for taking my project with me if I am going to work on something elsewhere.


These bags are perfect for keeping the parts and pieces together and out of the way. I also like that you can write notes on them if you want and you can readily see what is inside. I hang them together on the back of my door so when I am in the mood and have time to work on something I just check my stash to see what's ready to begin or in process. These bags are a generous 15" x 15" and will expand to roughly 6" in thickness.

Sunday, April 11, 2010

Compartmental Carrier

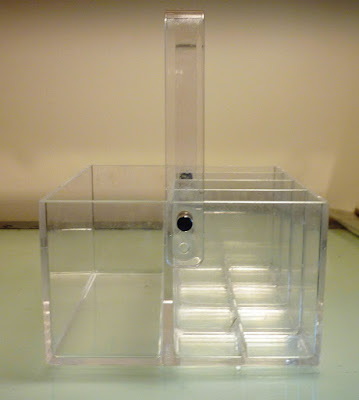
What's inexpensive, handy and portable? My new garage sale find! I bought this piece for a nickel! I couldn't even wait to clean it up before sharing it with you. This piece could be used for so many things. Can you tell I was excited to find it? It could be used for brushes, scissors, tools, crochet hooks, pencils and markers - just to name a few of the obvious items. If you chose not to use it in your studio, it could be used for silver/plastic ware and napkins or for cosmetic brushes and cosmetics, or hair care products and brushes and combs. For a nickel how can you go wrong?


The handle will adjust to two heights or is removable. The handle is also stationary so it doesn't tip when you are carrying it if the weight is not distributed evenly. One half of the box is undivided and the other half is divided into four equal size sections.


I think it will work great for my jewelry tools. I love the fact it is a tote and can easily be carried to where I will be working. I love that I can see through it. I also love that my tools rest securely in place and I don't have to worry about any of them dropping out or the tips getting damaged.


Keep your eyes open and your imagination in gear because you never know where you might find a treasure. Repurposing items is great for the environment as well. If they only had a nickel on this, odds are it would have gone to the dumpster had it not sold. One less item in the landfill. Go green!!!