You are probably ready for the next step in putting your studio back together by now. To briefly summarize what I have posted in the last couple of posts:
(1) If you are moving into a new space or redoing a current space, the best plan is to remove as much as possible from the room and sort through it as you do. Have a throw away area, donate area, items to think about later area and items to keep section. In your keep section, separate into categories (a) by medium such as quilting, beading, painting and then (b) by usage such as tools, supplies, resources. If you are organizing or cleaning your room, just do it in bite-size pieces and avoid being overwhelmed by thinking it all has to be completed at once.
(2) After all of the painting and prep work such as installing shelving is completed, prepare a floor plan according to your needs and bring in the large pieces of furniture and equipment. Evaluate the placement by mentally walking through projects and steps you take to complete each. If larger pieces aren't working, get rid of them if you can and consollodate a couple of stations into one area.
Now, (3) after you are satisfied with your arrangement, begin to bring in the supplies, tools and smaller pieces of equipment. Keep like items together as you place them in the areas you feel they would make the most sense to have them - near the area or station where they will be needed. By like areas I mean all the quilting related items, painting related or beading items as well as in each of these areas keeping cloth together, the papers in one area, paints grouped together, the beads, buttons and/or other embellishments together, stamps and inks.
Because you have separated and kept these items together you can readily see how much space will be required to store each. If it appears you have ample room you can begin to 'organize'. As you place items around the designated work area or work surface, keep in mind that not everything can be within reach. Keep items that you continually use such as certain tools or equipment in the most convenient area but preferably off your work surface unless it makes sense to have it there. Those items you rarely use should be placed in the more out of the way storage areas such as the top shelf or in a closet.
Remember these items are not glued into place and can be moved now or later to areas that make more sense. Also, at this point your studio is not going to look fabulous! Below are a few of my photos taken as I returned my tools, supplies and equipment to my studio.

I had already mentioned I had placed a deeper table in front of the window (above) which made it difficult to reach the window in order to open and close it. I had made the decision that larger table actually took up too much space and removed it from the room completely. I honestly don't miss it. Instead I use one larger work table and occasionally the counter shown above.
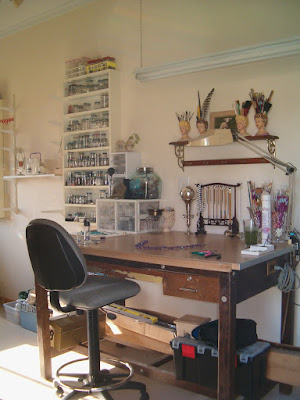
I do a few periodic projects in stained glass. For that I have a board that I set on top of the table. It allows me space to cut, place and solder the pieces. The grinder and some other supplies are on my rolling glass stand. I can remove my stained glass board and place it on the counter if I need to begin work on another project.
I often do watercolor painting on this same table. My paints are now kept near the table in a wire basket. My favorite brushes are on my table for easy access and safe keeping.
My bead projects are either done at this same table or in the house on a tray. Even though my beads are very close to my work table I use trays in my studio to gather my beads and findings for a specific project. When I complete the project I simply take the tray over to my bead storage area and 'unload' it. My beading tools are kept in a caddy as shown on a previous post. This makes it very simple to move in the midst of a project for whatever reason or to quickly put items away and clean up.

Above on the wall is the repurposed spice rack I discussed in a previous post. Also shown is the dress form I often use to hang a necklace on to see how it is going to lay. It is between my bead stash and counter area. One of these days she will get a makeover. I sometimes drape fabric over it to photograph jewelry, so it is handy to have it next to the window.

I have a few (more now added) display pieces I wanted to keep together. I don't do a lot of shows at this point, but felt I wanted to keep these for future open houses or show displays. They are on a shelf not real easily accessed because I don't use them often at this point. The shelf will be painted white at some time.

Above I have placed items used less often. The top shelf requires a ladder to access the items located there. Yes, this is where my plastic is. It protects the items I use less often such as stencilling and stamping equipment, framing supplies, paper making supplies and sculpting tools. The wire baskets on the shelf below that holds items I use a little more often, but not continually. They include for example some stained glass supplies, bead containers, string, and special tools such as wood burning, hot glue gun and heat gun. Notice I have placed tags on each container to identify in general what is contained in each.
Below are my favorites! Beads and lots of them! Can you believe I had all these gorgeous beads tucked away in drawers and plastic bags? I had the two sets of identical shelves made, painted them myself in a neutral color to show off the colorful beads and spaced them apart to allow for deeper shelving to be placed between them. You will see what I used it for in a later post. I also placed the shelves where they would get the most sunlight and sparkle the most.


Finally is my main work table. My son was getting rid of the fluorescent light fixtures so I snagged them and placed one on hooks above my counter and one above my work table. I placed one warm bulb and one cool bulb in each. I will discuss lighting in a future post, which is crucial in a studio.
As you can see, my beads are not far from the work table. Below my work table which is actually a drafting table, I had to store my leading for stained glass (the long skinny cardboard box). This keeps it off the floor and pretty much out of my way. I have also for now placed my tools under the table and a tool box containing my portable outdoor painting supplies.
The problem I am tackling right now is the unattractive heating and air conditioning unit in the corner (see below). I think I have found a solution for camouflaging it, but that is the area I am focusing on right now and will share the results when completed.

As you work in your room you will find things that aren't working for you. Figure out what isn't working and why. Then focus on how to resolve the issue. Brainstorm with friends and family members. They may have ideas that could work. They have the ability to focus on that one particular problem without being distracted and can look at it with fresh eyes. It might surprise you what they come up with and they will probably be flattered that you asked them which will make them really want to come up with something solid!
Also remember that your studio arrangement is not set in stone, at least I hope not. Things can be later switched around and rearranged if they aren't working or if your needs and interests change.
Again, I hope this post is helpful. Looking at the last image, what would you do to resolve this eyesore? The area can't be totally blocked off because of airflow and water drains from it into a bucket. The filter also needs cleaned so access to that is crucial. I just thought I would throw that out in case you wanted a challenge or had completed your studio with no problems and wanted to know what it felt like to have such a problem.
The next steps are the fun ones, so check back! See you soon!
2 comments:
I had a quick thought about what you could do to "hide" the air conditioning unit. (although it sounds like you've got an idea, so now you have a back up if it doesn't work out)
At lowe's you can pick up a roll of textured wallpaper (white) you can cut it to whatever length you need. Use acrylic paints, magazine cutouts, stamps, paint brush, rollers, etc to create a really inspiring wall piece. Since it's paper you can tape it to the air conditioner unit.
here's an example:
http://anahata.typepad.com/.shared/image.html?/photos/uncategorized/2007/04/12/wallpaper_class.jpg
Thanks for the great ideas and beautiful photos. Now when are you coming to my studio to work your magic?
Post a Comment